Setting up an Ant farm
Setting up ant farm. What should I keep my ants in? What equipment do I need? Do I need a queen ant? Where do I get my ants from?
Setting up an ant farm - what you need

Here is everything I needed when setting up an ant farm. Everything on the right of the folded up red tea towel is what comes with the Starter Kit.
Everything on the left of the red tea towel is other items I plan to use, though these are not essential.
I will explain what each item is as I use it.
Setting up an Ant Farm - the Nesting Box
The first thing I did was to wash the ant farm (nesting box and foraging box) with warm soapy water. Then I rinsed with fresh water and dried it with kitchen towel. You don’t have to do this, but I like to. If you do this then try to dry it immediately. Letting the water dry naturally might leave scale stains, especially if you live in a hard water area.
I poured in some of the light-coloured clay granules, which come in a little bag, making a layer about half an inch deep. This helps to trap excess water, which can help keep the ant farm soil moist.
Adding Soil
The next stage of setting up an ant farm is to put in the soil, or other substrate that you may be using. As you can see, I have made it a little higher than the entry ports on either side. I plan to top the whole thing up with soil shortly. You can keep your soil level below the ports if you wish. It’s purely what you prefer.
Once you have put your soil in, I would recommend packing it down a little. I use the handle of a wooden spoon by lightly poking the soil down. You don’t have to force it down, just lightly poke it. This compacts the soil a little which makes things easier for the ants later. Alternatively, if you don’t have anything to hand to poke the soil down gently tap the base on a worktop. This will allow the soil to naturally settle down on itself.
Making the Soil Damp

This is the stage of setting up an ant farm that I get most questions about. People get quite concerned about how to add water. Specifically how much water to add. This is an understandable concern. Therefore let me show you how much I use.
Making the soil damp is extremely important; if it’s too dry then the ants may not be able to create their nest in it. Too wet, and it can become waterlogged and mouldy.
The best advice I can give here is to use too little water rather than too much. You can always add more water as required. Because of my experience in this I can quite comfortably use water without worrying too much. Though I wasn’t always so confident.
As you can see in the picture, I have poured in enough water to make puddles. You can click on the image to see it more closely. What you see in the picture is about how much I pour in at any one time. I then wait for it to soak in and add more water as necessary.
How do you know when to add more water?
I allow the water to soak in, and then I leave it for about half an hour. When I go back to it after this time, I can see how far it has soaked down. Subsequently, I can judge how much more water to add. I generally have to repeat adding the water a second time. Sometimes I add water a third time before I am happy. If you want, after you have put the first lot of water in, you can leave it for an hour or more. Then decide whether you need to add more. It comes with experience. My advice would be to err on the side of caution and add little amounts of water every hour or so.
Oh, and one important thing to remember when setting up an ant farm: cover up the port holes on either side of the ant farm before you add the water. You can guess what will happen if you don’t. You will have noticed that your ant farm comes with three rubber bungs. One small conical, a larger conical, and one odd-shaped bung with a hole through it. Take the smaller conical bung and insert it into the thinner of the two ports on the sides of the glass ant farm. The larger conical will not fit into the remaining port, so what I do is block the remaining port with my finger, or some kitchen towel. As the water soaks into the soil and lowers past the ports, you can remove your finger.
Setting up an Ant Farm - The Foraging Box
Whilst you are waiting for the soil in the nesting box to get damp throughout, you can start to work on the foraging tank. How you set up your foraging tank is entirely up to you. There’s no one specific way to do it. Obviously you should tailor it to suit the species of ant you intend to keep, but for the purpose of this guide I am setting it up for Lasius niger.
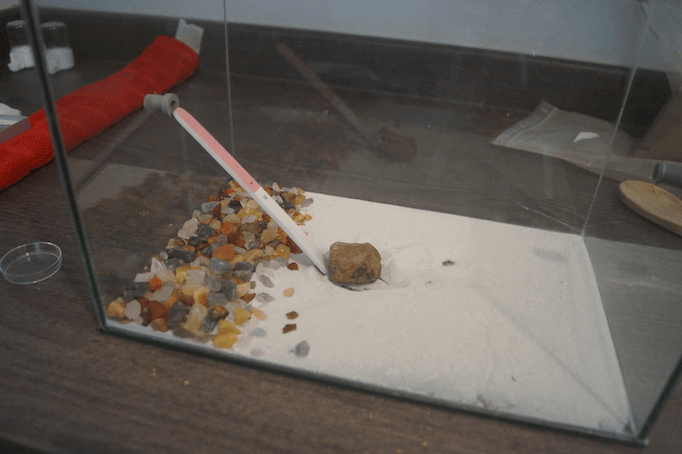
What you use at the bottom of your foraging box is your choice. I tend to use a light coloured soil for dark ants, and a darker soil for lighter coloured ants. It’s purely to make the ants stand out more so that it’s easier to watch them.
In the example above, I am using a white coloured soil, that does not come with the ant farm, but can be purchased separately. My advice here is whatever you use, keep it dry, and only put in enough to cover the floor of the tank. If it’s allowed to get wet, and especially if it is deep and wet, the ants may well nest in there. You don’t want that.
Hey Myrm, why not use the white soil in the nesting box?
That is a good question, and here’s why I do not use it when setting up an ant farm. This white soil has a dye in it. When it becomes wet the dye leaks out and stains the glass of the nesting box, as I once found out to my chagrin. Once the dye started to run it was like the glass of my ant farm had been whitewashed. Though it did not appear to harm the ants any, it did result in my not being able to see into the ant farm once the ants started tunnelling.
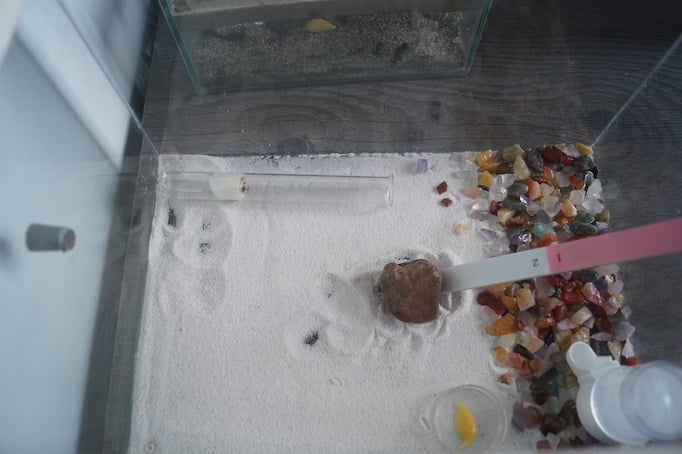
The coloured stones you see at one end are purely for decoration using a bag of small crystal tumble stones I had laying around. The pink and white stick-like thing is simply a nail file which reaches up to the tube port, which in turn leads to the nesting box. It’s not essential, as the ants generally speaking can climb glass very well. Though my Lasius umbratus seem to find difficulty with this. I do it just to make life a little easier on the ants. The stone at the base of the nail file is just a small stone I obtained from my garden. It is used to secure the base of the nail file, so that it doesn’t move or fall.
Making the Foraging Box Escape Proof

If you are keeping ants in captivity, then this something you definitely have to get right. From my experience, no matter how careful you are in making your ant farm “escape proof”, you will have escapees from time to time.
With this in mind it is important to take as many measures as you can to make your ant farm as escape-proof as is possible. There are various methods you can use, but here I will describe my favourite method. It is one with which I have had good success.
Insect Repellent - keeping ants in captivity
My preferred method is to use a barrier of insect repellent when setting up an ant farm. I place the repellent along the inner edge of the top of the foraging box. So successful do I find this that my Lasius umbratus and Myrmica rubra set ups have no lids on the foraging box at all. However, I do recommend you use your lid as well any other barriers that you use.
You can see in the picture above that I have a physical barrier lining the inner edge of the foraging box. This barrier is simply some sticky draught tape, also known as “weather strips”. It’s a strip of foam that is sticky on one side, and usually comes in rolls of about 10m or so in length. I have simply cut four lengths of it matching the measurements of the sides of the foraging box. Then I stuck them to the glass, on the inner edge, about a centimetre or so from the top edge. I then used a half inch paint brush to paint a thin layer of the insect repellent onto the glass above the weather strip.
I also ensure the weather strip is coated in the stuff too. The weather strip helps to prevent excess repellent from running down the sides of the foraging tank to the sand below. I find this extremely effective. The repellent will not kill your ants, unless they decide to walk over it, but rather it repels them. They hate the smell of it, and once experienced, they will not want to go near it again.
Polytetrafluoroethylene (PTFE)
Other ant keepers have found a substance called PTFE, or “liquid Teflon” to work just as effectively. Polytetrafluoroethylene is a synthetic fluoropolymer of tetrafluoroethylene. It is designed to be smeared on the inside of the glass and creates a barrier that ants do not seem to be able to climb on.
I have seen it used effectively, but for some reason it never really worked well with my ants. It seemed to deteriorate too quickly.
How often do I need to reapply the repellant barrier?
The answer to this is “as often as it needs to be re-applied”. However, I realise that it is not really a helpful answer to the beginner. Therefore, I would recommend that you check the barrier perhaps once-per-week. Look at it and see if it still seems damp. Smell it and see if the scent of the repellent is still there.
Another great giveaway that it needs re-applying is, are there ants sneaking across it. If in doubt, re-apply. You can’t really use too much, unless it is starting to drip down into the tank. When I applied/re-apply it, I simply use a paint brush to paint some more on. No need to plaster it on, like a bricklayer putting down cement for a brick wall,. A thin layer is fine. The longest I have left mine without re-applying is three months. In the end the ants were starting to cross.
Setting up an ant farm - the finishing touches
When setting up an ant farm, you will also need to consider food and water for your ants. Most people work out how to give food to their ants. However, I do get asked many times, how do I give water to my ants to drink? .
There are various methods, such as using a spray mist bottle to lightly provide a fine mist of water droplets into the foraging tank. This does work well, and I used to use this method myself, but I found it makes the soil damp, which may encourage the ants to nest in it.
I also found that, if you live in a hard water area, when the water droplets that are on the glass of the tank dry out, it can leave a limescale stain on the glass, which is harmless, yet unsightly.
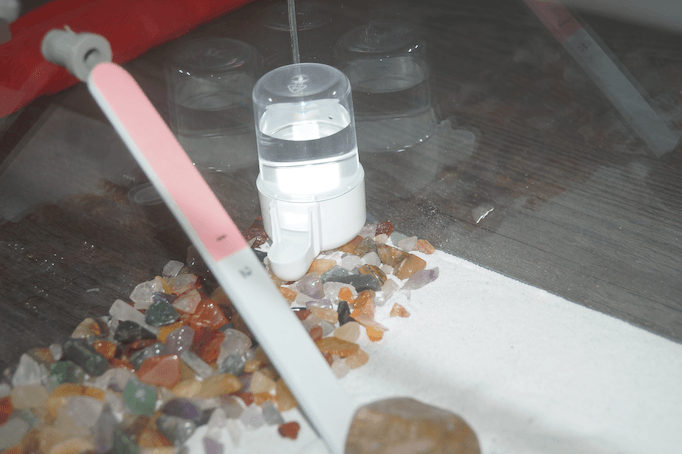
I use a more controlled supply of water, which can be attained using various methods. One is to simply use a small lid, say from a coke bottle or jam jar, and place damp cotton wool into it. You can then top up the water as is necessary. This is good because the cotton wool provides a safe way for the ants to access the water, without falling in and drowning. It does need regular topping up though, especially on hot, dry days.
Currently I use a bird seed dispenser as shown in the picture above. I fill the top part with water, place on the lid (in fact the “lid” is actually the base of the dispenser), and then stand it up in the foraging tank. The water flows into the dispenser and is available for the ants to drink from.
Will my ants drown if they fall into the water?
If you are concerned about the ants falling into the water dispenser and drowning, you can put a piece of cotton wool into the dispenser to act as a wick. However you choose to provide water to your ants, you must remember to check it regularly, topping up as required. I tend to do this every morning. Ants do get a lot of their fluids from the food they eat.
What food should I give my ants?
Food is, obviously, another vital commodity you must provide to your ants. Yet another common question I get asked is what should I feed my ants? or, how much should I give my ants? and how often should I feed my ants? The answers to these questions are quite simple. You feed the ants with as close a diet that they would eat in their natural environment, and you give them as much as they will eat.
For example, if you are keeping Leafcutter ants, then you need to provide them with leaves. Not that they eat these leaves, but they use them to harvest a type of fungus, which is what they eat. Harvester ants require, among other things, seeds. Vampire ants require blood (no, I am not kidding!). However, here we are talking about Lasius niger, and also applies to many other UK species of ant.
A good thing about keeping Lasius niger is the variety of foods you can give them. I do try to provide them with a diet that is as close as their counterparts in my garden eat, namely, insects. These insects can include flies, beetles, spiders, moths, and the larvae of various insects. You can either capture these insects, kill them and then give them to your ants, or you can purchase live insects from various online sellers. You can even breed your own insects if you have the means to do so. I have a large plastic storage box that I keep cockroaches in, providing a regular supply of food for my ants.
What about when I go on holiday? Keeping ants in captivity.
This is another concern that ant keepers contact me with. Let me reassure you now; unless you are going away for more than one or two months, there is nothing to worry about. Ants can go for a very long time without food. They often eat their own dead, or unviable/damaged eggs that the queen (or sometimes the workers) lay. Ants, too, can go for long periods without water.
I spent 24 years in the navy, and much of that was spent at sea, for 6-9 months at a time. Often, when I was away a friend of mine would pop in to feed my ants for me. However, he was in the navy too, and there were times when both he and I were away on different ships. On occasions like this my ants went without food for several months.
One time, my ants were not fed for 6 months. It was an emergency, short-notice ‘crash draft’ to seafood which I had 48 hours notice. Therefore I had no time to arrange for somebody to feed my ants. I was not expecting them to have survived when I got back. Surprisingly, they were fine. Their numbers had dwindled due to the queen not having enough nourishment to produce many eggs, but other than that, there were no real problems.
Why am spinning this salty shanty? To show you that there’s no need to worry if you are going away for a week or two. Your ants will be fine.
What if I can't/won't kill insects for my ants?
If you cannot or will not kill any living creature then you can also feed your ants with a protein jelly, such as the type often used by reptile keepers. Ant colonies can thrive on this protein jelly. You can feed your ants on sweet foodstuff, such as sugar-water, jam, honey or fruit. However, the problem with this is that although the adult workers can quite happily live on a sweet diet, the queen and her larvae really need protein. The queen need it to produce eggs, and the larvae to enable good development.
Should I kill the insects before giving them to my ants? That is entirely up to you. I tend to kill the insects I feed them with, but that is just my personal preference. Certainly, with cockroaches I do as it can be hard for the ants to kill and eat these creatures due to their armour-like exoskeleton.
Should I place the food directly onto the soil of the foraging tank? There’s nothing wrong in doing this, after all, ants in your garden eat their food directly off the soil. However, I tend to put their food into a little dish simply to keep the soil in the foraging tank as clean as is possible. You can use anything to use as a food bowl for your ants, such as a jar lid. If you purchased the Starter Kit ant farm, it comes with a little food dish.
Setting up an ant farm - Back to the Nesting Box
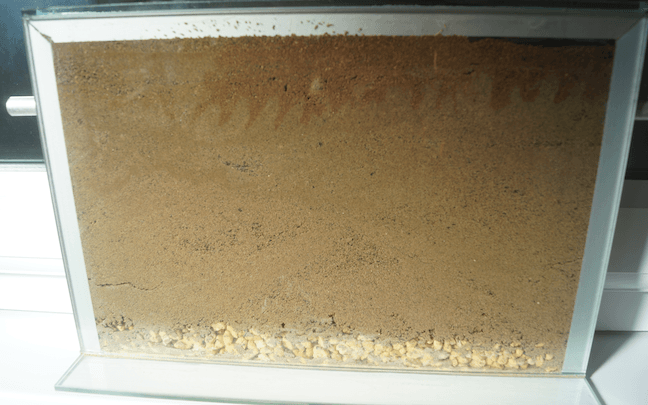
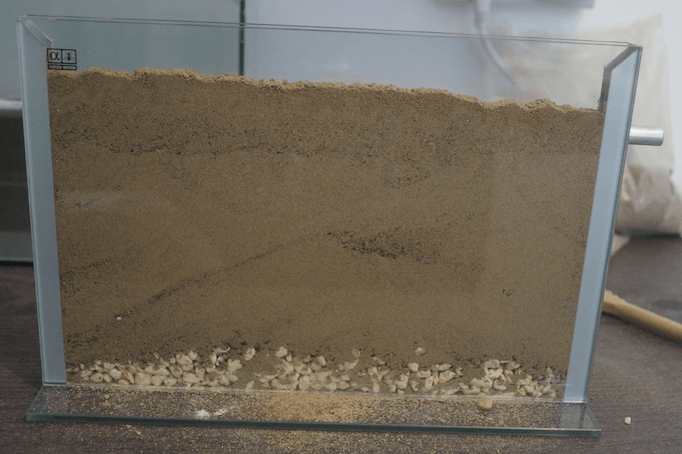
Once you have set up your foraging box to your personal specifications, you can turn your attention back to the nesting box. The picture here shows that all the soil in my new ant farm nesting box is now damp all the way through. However, admittedly this was taken the day following my initially putting water into it. Not because it took that long, but because I had to take a break in making this guide in order to continue family things. You’ll probably find that it took an hour or so to get to this stage.
Notice that in my picture that I have topped up the soil in the nesting box so that it is all the way to the top of the box. You need not do this if you do not wish to, it’s just my personal preference. You will also notice a slightly different coloured soil in the upper right of the farm. This is just because I used the already opened bag of soil used in the nesting box and had run out. Rather than opening a new bag I simply used an already opened bag of a slightly different soil.
Setting up an ant farm - the final stage
Now is the time top connect the nesting box to the foraging box. With your Starter Kit you will have received three rubber bungs, as I have already mentioned. The smaller of the two conical bungs is inserted into the thinner of the two ports on the nesting box. The larger of the two conical bungs is inserted into one of the holes in the foraging box. The remaining bung, which it like a T shape with a hole in it is inserted into the other hole in the foraging box. You need to insert it from inside the foraging tank so that the bung pokes out of the foraging tank.
Push the bung so that the T end of it is flush against the inside of the glass wall of the foraging tank. Next, take the length of clear plastic tubing that comes with the Starter Kit, and push it firmly and securely onto the part of the T-bung that sticks out of the foraging tank. The other end of the tubing is slid onto the larger of the ports on the side of the nesting box.
Finally, I would strongly recommend that you cover up the nesting box so that no light shines onto the soil; ants prefer to nest in the dark. When you want to look inside the nest you can simply remove the covering, replacing it once you have finished watching the ants.
Keeping ants in Captivity - Putting the Ants into the Ant Farm
Now that you have your ant farm set up to your own personal preferences, and that of your ants, it is time to place the ants into the ant farm. How do you do it? Is it easy to do? The answer is, it is as easy or as difficult as you want to make it. As you can see in the picture, I have simply removed the cotton wool bung from the test tube. I then placed it onto the foraging box. I have made no attempt to force the ants out of the tube. Unless it’s absolutely necessary for me to move the ants out of the tube, I leave them alone. I simply allow them to move out of the tube and into the ant farm in their own good time.
Do not expect your ants to move out quickly. I can take some time for them to do so. I have had ants that have moved out within an hour. In contrast, I have had ants that have taken months to move out. You really do have to be patient and allow the ants to move out when they feel good and ready.
What if you need to get your ants out of the test tube?
What if you need to get your ants out of the test tube?
There may be an occasion when you really need to move your ants out of the test tube. Perhaps you’re concerned by the amount of mould inside it. Well, I am sure the ants would move out quickly enough if this was the case. But if they stubbornly refuse to move out, and you need them out of that tube then what is the best way? The best way is to use a method that produces as little stress as is possible. For example, I would not recommend you just vigorously shake them out. Rather, here are a few ideas:
Perhaps you could place the test tube into the foraging tank at a steep angle, with the opening toward the ground.
If the test tube is covered with something that has been keeping it dark in the test tube, then you could remove the covering. This may cause the ants to move out into a darker area of the ant farm. It may be worthwhile placing something into the foraging tank that they can go hide in. Something that provides some level of darkness and security. If you do have such a thing then place it near the test tube so that the ants can find it quickly. I have seen some people uncover the test tube and direct a constant light source onto it, such as a lamp. I am not keen on this idea because of the extra heat it can produce, especially if the test tube is glass, but it can help to get the ants to move out quickly.
Keeping ants in captivity- continued
If the ants refuse to move out you could try gently tipping them out, gently tapping the glass to help get them out, but do not shake or hit the tube too vigorously. Make sure you tip them near where they can find shelter.
Attach the test tube directly to the larger of the two ports on the side of the nesting box, the one that the plastic tubing goes on to. You can always reattach the tubing once the ants have moved out, and you can take the test tube away. If the mouth of the test tube is too wide to securely fix it to the port, then wrap some tissue around the port so that it, effectively, makes the port fatter. Then slide the test tube onto the port and allow the ants to move out into the nesting box. This probably would be more successful if the soil level in the nesting box is below the port.
Chill those ants!
Chilling the ants is an effective way of moving the ants. But be very careful! Place the test tube into the refrigerator, but not near the back (where ice can build up), and not near any ice box. Leave them for about half an hour or so. Unlike honeybees, and indeed us humans, ants cannot shiver. When they get cold they cannot produce the extra heat that shivering creates. The ants will start to slow down and become sluggish. This tends to happen in temperatures below 5 degrees Celsius (41*F). The ants may huddle together for warmth.
After about half an hour or so, remove the test tube from the refrigerator and gently tap the ants into the ant farm. Be quick though, as the ants quickly recover once they start to warm up. I tend to use this method as a last resort, as it can go horribly wrong if you put the ants into too cold an environment.
My preferred method, and my best recommendation, is to simply place the opened test tube into the foraging box. This allow the ants to move out when they feel ready to.
I hope the above has been of some help to you in setting up your ant farm.
If you have any questions, or you feel there is something I have missed, then please feel free to contact me by clicking on the CONTACT option in the menu bar.
Download this guide in pdf format
Ask questions about ants
If you wish to ask me a question about ants (and no, I won’t tell you how to destroy them or their nests!) then please contact me on my**@********co.uk or you can ask on the contact thread
I aim to respond to your questions as quickly as I can, normally within 24 hours.